


.jpg)

%20(1).png)
%20(1)%20(1).png)
.png)


%20(1).png)
July 8, 2019
Exploring digital twins part 2: IoT Hub, Azure Functions and SignalR
This is the second in a series of tech blog posts by Rose McColl and Lillian Ho, about some recent Innovation Lab work on Internet of Things (IoT), digital twinning, and the 3D visualisation of IoT device sensor data in Mixiply, Theta’s augmented reality (AR) platform.
In part 1 of our tech blog series on IoT and digital twinning, we talked about how we set up an Azure IoT DevKit device to send sensor data to Azure IoT Hub.
Completing the prototype for real-time monitoring of device data
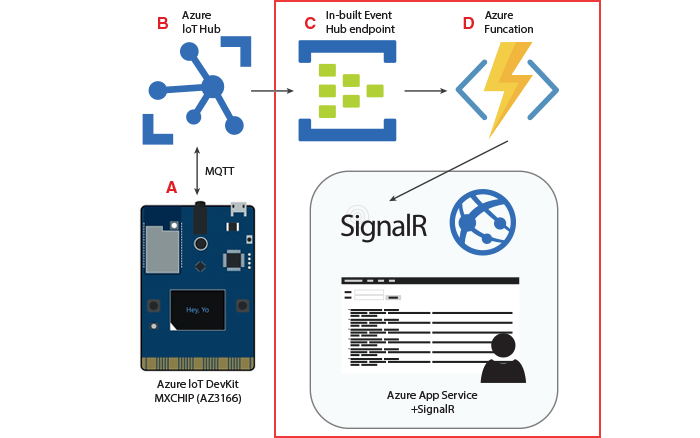
In this post, we’re going to complete the remaining components of our initial prototype for real-time monitoring of the incoming device data (the parts in the red box in the image above).
We’ll be taking a look at IoT Hub’s built-in Event Hub endpoint, setting up an Azure Function and creating a basic SignalR application to display our device data.
The built-in Event Hub
Azure IoT Hub comes with a built-in Event Hub endpoint, which is the default endpoint for all messages coming into the IoT Hub. Event Hub is a data ingestion and processing service which can handle millions of events per second, from any source, with low latency and high reliability. In the prototype setup we are creating, it will serve as the central point where all our device messages are received and temporarily stored until they are ‘consumed’ by our SignalR application.
This is a temporary setup, because in larger-scale IoT applications, you would probably want some control over what happens to different types of messages. IoT Hub lets you manage this using its Message Routing service. You can set up different rules for incoming messages based on their properties. For example you might want to send some messages to storage where you will analyse them later, or when a sensor detects a temperature anomaly you might want to get send out an alert by forwarding a message to a topic queue. For now we’ll just use the default Event Hub.
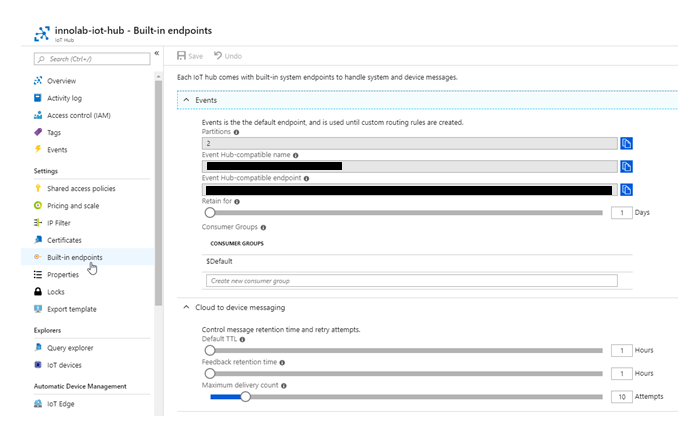
Because Event Hub is already built into IoT Hub, we don’t need to do any setup. All we need to do is to grab the endpoint name and connection string, because we are going to need them in order to connect up an Azure Function to the Event Hub to collect data as it arrives in the Hub.
To access the hub name and connection string in Azure Portal, go to Built-in endpoints in your Iot Hub:
Creating a SignalR Application
Next we want to create a basic SignalR application that will receive incoming messages and display them in a simple user interface, in real time – i.e. as they arrive in the Event Hub.
SignalR is a .NET library for making real time web applications. It gives the ability to have server code push content to connected clients instantly as it becomes available, rather than having the server wait for a client to request new data.
We’ll create our SignalR web app in Visual Studio. You can follow the Getting Started tutorial on the SignalR documentation to set up the project. The main points are to set up a new ASP.NET Core Web Application using ASP.NET Core 2.2 as the target framework, and then add the JavaScript SignalR client library to the dependencies. You don’t need to add the SignalR server library, because it’s already included in the Microsoft.AspNetCore.App package.
We called our project IotSignalRApp, and instead of creating a ChatHub like in the tutorial, we create a MessageHub, which is as simple as this:
The MessageHub contains a method called SendMessage, which accepts a device name and the message (the data from the device). When it receives a message from a device it then forwards it to all connected clients.
The JavaScript for rendering the device messages in the UI is just:
And the HTML:
You can also add a Controller to handle messages coming from HTTP requests, for example:
With our app set up, we can now deploy it to Azure so it’s ready to start receiving device data.
How to deploy from Visual Studio to Azure is described in detail in the Microsoft documentation.
Azure Functions
Finally, we need an intermediary between our Event Hub and the SignalR application. This is what we will use an Azure Function for. It will grab incoming messages from the Event Hub and forward the messages to a SignalR application, kind of like a courier. Azure Functions is a good tool for this task, because it is easy to implement and scalable.
What is Azure Functions?
Azure Functions is a serverless compute service that enables you to run small pieces of code on-demand without having to explicitly provision or manage infrastructure. It’s perfect for IoT applications because you can scale up the number of devices, and your Functions will scale up accordingly.
Function apps can be triggered to run by particular events, such as a message being added to a queue, or an item being added to Blob storage. In our case, our Function will be triggered whenever a device message arrives in the IoT Hub’s built-in Event Hub.
The development tools you need to write, debug and deploy Azure Functions
We will write our Function in VSCode, using the Azure Functions extension. You also need Node.js and npm. To enable debugging you also need to install Azure Functions Core Tools. Once these are installed in VSCode, you can easily write, debug and deploy Azure Functions. Because we will be using SignalR, we are also going to need some .NET extensions in VSCode. To develop in C#, we’ll install the C# extension, and to install NuGet packages, we need the NuGet Package Manager. Now we can get started with coding.
Creating a new function
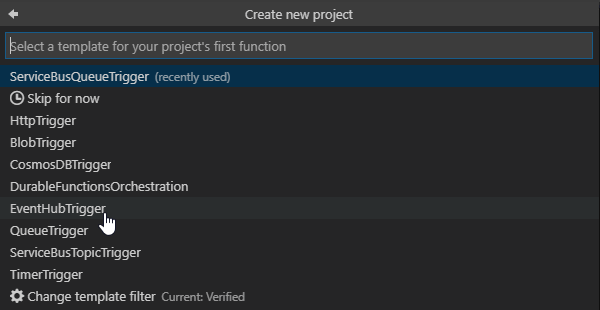
To create a new function, open up an empty VSCode window, press F1 to open the command palette, and choose Azure Functions: Create Function…
Create a new project and choose C# as the language to create the project in. Then you need to choose the template for the Function you want to create. We want our Function to be triggered by messages coming into the Event Hub, so we use an Event Hub Trigger template:
Give your Function a name (e.g. IoTEventHubFunction, and a namespace (e.g. Innolab.IoTEventHubFunction).
Now you are asked to create a new local app setting. This is where we need our Event Hub name and connection string.

Select the Azure subscription you want to use. Then it asks for an Event Hub namespace; we called it ‘innolab-iot-EVENTHUB’, and an Event Hub name; enter the Event Hub name that was obtained earlier from the Azure Portal.
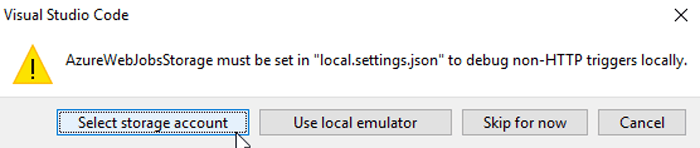
Finally, we need some storage in order to debug locally. If you don’t have a storage account set up in Azure, then you can create one by following these instructions, or you can use a local emulator.
After choosing your storage, you are asked where to open the project. Choose ‘in the current window’.
The project structure will look something like this:

The first thing to do is to check local.settings.json. It will contain values for your storage account and your Event Hub. You’ll need to paste in the Event Hub connection string that we got earlier. It should look something like this:
When we look at the function template (IoTEventHubFunction.cs), we can see that there is a class called IoTEventHubFunction with a method called Run. This method will contain our Function logic. It is prepended by an attribute called FunctionName. This is what indicates that the method is a Function entry point. We can also see that the Run method is passed in event data with an EventHubTrigger attribute containing our Event Hub name and a reference to the connection string (the "innolab-iot-EVENTHUB" key contained in local.settings.json).
Next we’ll be adding our code to forward our incoming events to the SignalR application. For this we need to install the SignalR client package using NuGet. You can use the command palette (F1) to add and remove packages:

Add the Signal R client package by entering Microsoft.AspNetCore.SignalR.Client at the prompt and then choose the latest version. Alternatively, you can run the command ‘dotnet add package Microsoft.AspNetCore.SignalR.Client’ in the terminal. Now we’ll need to restore the project to include our new package in the .csproj file. Press F1 and find the .NET Restore Project command:

Now to add the logic to forward the Event Hub messages to the SignalR application:
The Function is going to get messages (events) in batches from Event Hub, so we have a loop to process each event. We extract the messageBody from the event as a string, then we deserialize it into a Dictionary object. This is because we want to get our device name from the message.
Next we are using the SignalR Client to create a connection to the messageHub in our SignalR web app. We start the connection, and then we can invoke the "SendMessage" method, passing in the device name and the messageBody.
Testing the function locally
We’re ready to test the function locally. To debug, you can press F5 and it should connect to the functions host runtime, because when you created the project in VSCode it should have automatically created a debug configuration. This allows you to debug normally, putting in breakpoints etc in your code. Unfortunately, there seems to be a bug, and we found that often the functions host would not start correctly. If this happens, you can run the command ‘func host start’ in the integrated terminal, however it will ignore any breakpoints you have created.
While your function is running locally, you can try running your IoT device and sending messages through to the IoT Hub. Any incoming messages should be picked up by the function and processed. We put in a log message to show when a message has been processed, and what the content of the message is, so if everything is working you should see the messages popping up in the output console. You should also be able to navigate to the SignalR web app and see the messages coming up on the screen there too.
Deploying the function to Azure
Once everything looks good, we can deploy the function to Azure. Press F1, and find the command Azure Functions: Deploy to Function App…
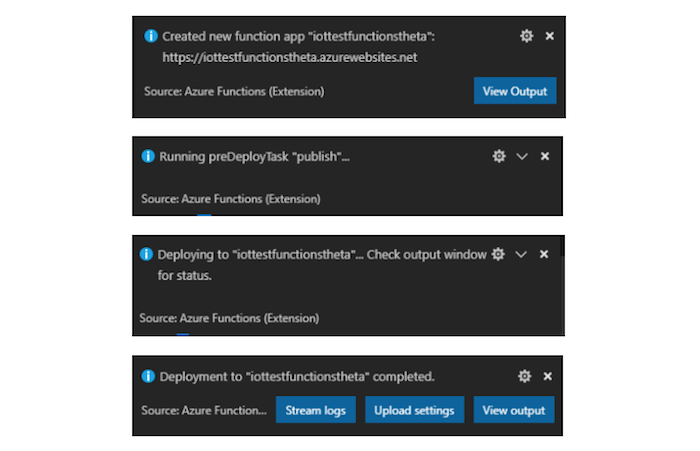
Choose a subscription, and choose Create New Function App in Azure. Enter a unique name for your function, select Windows as the OS, Consumption Plan as the hosting plan, and .NET as the runtime. Then choose the resource group and storage account to deploy to. The new function app will now be created in Azure, and the function will be published to the app. You should see a few notifications as the deployment proceeds:
End-to-End result
Now we have all the components of our initial prototype in place. We can run our DevKit device to send some telemetry and we’ll see the messages popping up in near-real time in the SignalR app.
In our next posts we’ll be discussing how to connect a Raspberry Pi to IoT Hub and then we’ll look at creating digital twins of our devices by visualising our device telemetry in 3D!
Related Posts
.png)
July 1, 2019
Exploring digital twins part 1: Azure DevKit and IoT Hub
This is the first in a series of tech blog posts about some recent Innovation Lab work on Internet of Things (IoT), digital twinning, and the 3D visualisation of IoT device sensor data in Mixiply, Theta’s augmented reality (AR) platform.
%20(1).png)
July 30, 2019
Exploring digital twins part 4: AR/VR Digital Twinning with SignalR and Mixiply
This is the final post in a series of by Rose McColl and Lillian Ho, about some recent Innovation Lab work on Internet of Things (IoT), digital twinning, and the 3D visualisation of IoT device sensor data in Mixiply, Theta’s augmented reality (AR) platform.
%20(1).png)
July 15, 2019
Exploring digital twins Part 3: Raspberry Pi and Azure IoT Hub connection using Python
This is part three in a series of blog posts about some recent Innovation Lab work on Internet of Things (IoT), digital twinning, and the 3D visualisation of IoT device sensor data in Mixiply, Theta’s augmented reality (AR) platform. Extending from part one, this post will demonstrate sending telemetry from a Raspberry Pi IoT device to Azure’s IoT Hub, using Python.