


.avif)

%20(1).png)


.png)


%20(1).png)
November 27, 2019
Enhancing Digital Twins Part 4: Writing Databricks' Predictive Maintenance Results to Blob
In this post, we will detail how we committed our results from part 3 to Azure Blob Storage so it's accessible to our Digital Twins project.
In part 4 of 4, we detail how we committed our Predictive Maintenance results to Azure Blob Storage so it's accessible by our Digital Twin project. In part 1 of this series, we introduced the concept of Predictive Maintenance in Digital Twins. In part 2, we set up the Databricks environment to prepare for Predictive Maintenance analyses. In part 3, we detailed the R analyses we conducted on our Predictive Maintenance dataset from post 2 to help our Digital Twins project make better informed suggestions.
1. Forming JSON output from R analyses (R)
There are myriad ways to construct json in R. We chose to use CRAN’s ‘sprintf’ function, which returns a vector according to our predefined output format.
Build up the json structure starting from the most nested objects.
Then gradually build the final object level by level.
We suggest intermittently printing out the resulting json object to check it against a JSON validator to ensure the JSON is well formed.
2. Writing JSON output to Databricks Clusters’ driver node (R)
Since we chose to write to Azure Blob Storage using Python, we need to store the resulting JSON output in a location accessible throughout different cells and manipulatable regardless of language. To do this, we enlisted the help of the ‘write’ function from CRAN’s jsonlite package which can save the JSON file to a directory of your choice via its path.
We favoured saving to the Databricks default location. You can use this Python script to find out where your Databricks saves on default:
We found that Databricks saves to ‘/databricks/driver/’ on default, the driver node of our cluster. The driver node oversees the commandment of its worker nodes to fetch and pull data from various sources. You should ensure your driver memory is capable of handling your read/write operations.
You could also consider reading from and writing to Databricks' File System.
Using jsonlite’s ‘write’, we wrote the JSON output to the location Databricks naturally saves to.
3. Writing JSON output to Azure Blob Storage (Python)
We will now begin writing to our notebook in Python, so in each Python cell, remember to prefix it with ‘%python’ if it isn’t your notebook’s main language.
Before writing to a Blob Container, you have to first create an Azure Storage Account Container. We recommend doing it through the Azure Portal as it’s quick and easy. Keep note of its storage account name, container name and access key as you’ll need them later.
We can access our Blob container using Spark and Databrick’s API, which is available to Python.
Form a connection to your Azure Blob Container as below, replacing the placeholders with your own credentials.
Databricks is only capable of saving to folders, so formulate your Blob Storage path so it points to a folder instead of the root of the Storage Account Container. It should look something like: ‘wasbs://yourContainerName@yourBlobStorageName.blob.core.windows.net/yourStorageFolderName’
We chose to harness Spark’s DataFrameWriter API to write our JSON output to a blob. The DataFrameWriter API allows us to write DataFrames to external storage systems using its ‘Save’ method.
Before this step, we will have to convert our JSON file into a DataFrame. We fetch and load the JSON output by its path before transforming it into a Pandas DataFrame as Pandas doesn’t require us to specify a schema for a list of objects.
As it is now a Pandas DataFrame, we can then easily convert it to a Spark DataFrame to prepare it for Spark’s ‘Save’ method.
The mode parameter specifies the behavior of the save operation in case the data already exists. The ‘overwrite’ mode best suited our needs, but you can also ‘append’ the data, ‘ignore’ the operation or throw an ‘error’.
The path parameter must be a path to a Hadoop-supported file system, a condition which Azure Blob Storage satisfies. Once this is executed, the blob will be written to with your JSON output.
4. Cleaning up Azure Blob Storage after write (Python)
A strange effect of writing to Blob through Databricks is that it commits multiple unnecessary files alongside your JSON output. This happens on every write and will start to exponentially crowd your Blob Storage. These unnecessary files come in multiple forms and recognising them helped us to eliminate them. The following shows the results you can expect from a single write to Blob Storage - 5 files are committed even though only the last one is necessary.
Note the Blob name, formatted like ‘part-xxxxx-tid…’, is autogenerated on commit. We will change the Blob name later, alongside the Blob Storage cleanup. The unnecessary blobs fall into one of 2 categories, they are either of size 0 or contain ‘committed’ in their name. We will remove the unnecessary blobs according to these conditions.
In order to retrieve the committed blobs, we made use of Databrick’s ‘dbutils’ Utility which has several helpful methods to help us interact with Azure Blob Storage. ‘dbutils’ mounts a folder within our Blob Container to Databrick’s File System. The mount acts as a pointer, giving us directions and accessibility to said folder. However, we will first change the Blob name of our JSON output, so it’s no longer prefixed with ‘part-xxxxx-tid…’, else we risk deleting it during cleanup.
Writing to Azure Blob Storage through Databricks is a pain point as Databricks is incapable of accepting a blob name for the JSON output on initial commit. We tried extending the path parameter in Spark’s ‘Save’ method to include a blob name with its extension and found it created a blob with the correct name, but with no content.
A way to circumvent this effect is to reformat the name of the blob after its creation. This can be done using dbutils.fs.mv(toPath, fromPath) – Databricks Utility File System Move, which allows you to move a file or directory across file systems, parametrized by the to and from paths of a blob.
First, we will list the entire Blob folder to retrieve the blob we created moments ago.
Then we will filter the list to extract only the files with names starting with ‘part-’ before getting the second item’s path from the list as the second item is the last item in the list.
This path will be the fromPath parameter in dbutils.fs.mv(toPath, fromPath). Construct your toPath as you see fit, we relocated the blob to the same folder, under a new blob name, ‘json_output.json’.
After executing this, you will have renamed and/or relocated the last item in dbutils.fs.ls(folderPath).
Now we can remove the redundant files from Blob Storage. Relist the items in the folder and filter the files according to the aforementioned conditions. Files are removed using dbutils.fs.rm(blobPath) – Databricks Utility File System Remove.
Finally, if you re-execute dbutils.fs.ls(folderPath), you should only see the renamed file in your Blob folder.
Please note that we are purposefully overwriting a single Blob, but this might not be appropriate for your purpose. In order to not lose a record of a previous analysis in Blob, you will have to make sure your toPath for dbutils.fs.mv(toPath, fromPath) is unique across the Blob Storage folder. Here are some suggested ways to create a unique Blob name:
- You can keep the name (‘part-xxxxx-tid…’) which Databricks automatically assigns Blobs
- You can count the number of Blobs in the Blob folder with dbutils.fs.ls(folderPath) before any write operations and attach this count to the end of the current Blob’s name. For example, a blob folder with initially 0 items will be written to next with a Blob named ‘json_output0.json’
- You could also name the Blob with the date time at the time of analysis by using Python’s datetime module. For example, a Blob might be named ‘2019-09-23 02:59:37.465105.json’
Now that we’ve committed our R analyses results from our Predictive Maintenance dataset to Azure Blob Storage, we can access the Blob from a greater number of applications.
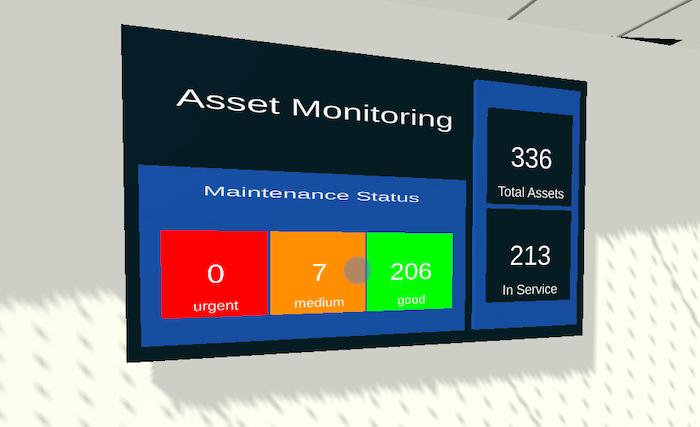
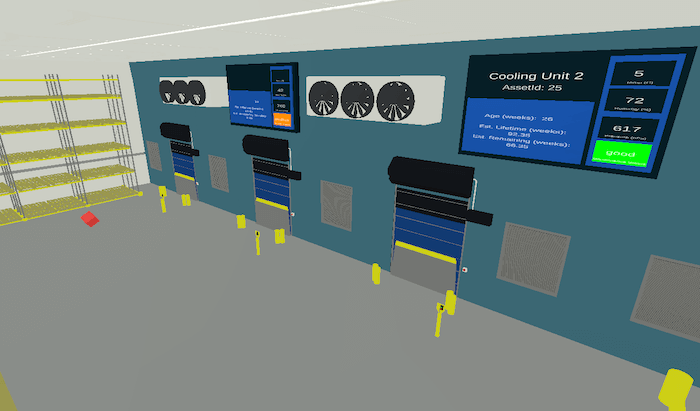
Like we’d initially set out to do, we retrieved the JSON output Blob from Mixiply in order to visualise better asset maintenance suggestions and alerts in our warehouse’s digital twin.
And that's it for this series on enhancing Digital Twins with Predictive Maintenance.
We've shown that Digital Twins, with the help of AI and machine learning, could be used to predict and diagnose asset failures before they even happen. This is just the start as Predictive Maintenance is only one of many possible additions to digital twin technology. We can't wait to see what else you come up with.
Related Posts
%20(1).png)
November 27, 2019
Enhancing Digital Twins Part 3: Predictive Maintenance with Azure Databricks
In this post, we will detail the R analyses we conducted on our Predictive Maintenance dataset from post 2 to help our digital twin projects make more informed maintenance suggestions.
%20(1).png)
November 26, 2019
Enhancing Digital Twins Part 2: Setting up Azure Databricks for Predictive Maintenance
In this post, we will elaborate upon Azure Databricks, and explain how we set it up to prepare for Predictive Maintenance of our digital twin’s corresponding real-life assets.
%20(1).png)
November 25, 2019
Enhancing Digital Twins Part 1: Harnessing Data and Predictive Maintenance to Enhance Digital Twins
Part 1 of a 4-part series about displaying Predictive Maintenance insights in Digital Twins, using Azure Databricks. Before we get into the setup details, we’ll introduce the concept of Predictive Maintenance and the tools we used to make predictions.